Baking mini donuts in a visible air fryer feels like magic. The transparent window allows everyone to watch the donuts turn golden brown. Whether you’re using a touch screen oven air fryer or a mechanical electric mini air fryer, the process is straightforward. This method is perfect for air fryer for different food, making it both versatile and enjoyable.
Preheat Your Visible Air Fryer
Importance of Preheating
Preheating a visible air fryer is a step that many overlook, but it’s essential for baking mini donuts. When the fryer is preheated, it ensures that the cooking environment is evenly heated before the donuts go in. This helps the donuts cook consistently, giving them that perfect golden-brown color. Without preheating, the fryer might take longer to reach the right temperature, which could lead to uneven browning or undercooked spots.
Think of it like preheating an oven. Just as an oven needs time to warm up, so does your visible air fryer. Skipping this step can affect the texture and flavor of your donuts. Preheating also reduces cooking time since the fryer is already at the ideal temperature when the donuts are placed inside.
Tip: Preheating is especially important for recipes that require precise cooking times, like mini donuts. It’s a small step that makes a big difference!
Preheating Time for Mini Donuts
The preheating time for a visible air fryer depends on the model, but most fryers only need 3-5 minutes. Check the manufacturer’s instructions for specific guidance. For mini donuts, setting the fryer to 350°F (175°C) during preheating works well. This temperature creates the perfect environment for the batter to rise and brown evenly.
To preheat, simply turn on the fryer and set it to the desired temperature. Wait until the fryer signals that it’s ready—this is usually indicated by a beep or a light turning on. Once preheated, you’re ready to start baking your mini donuts!
Choose the Right Mini Donut Batter

Best Batter Recipes for Air Frying
The right batter makes all the difference when baking mini donuts in a visible air fryer. Some recipes are specifically designed for air frying, offering a light and fluffy texture with less oil than traditional frying. These recipes are perfect for creating a sweet treat without the mess of deep frying.
Here are a few popular options:
- Classic Biscuit Donuts: Use a can of jumbo flaky biscuits. Cut out the centers, air fry at 360°F for 4 minutes, and coat with melted butter and a cinnamon-sugar mixture.
- Yeast-Raised Donuts: These donuts are soft and delicious. They rise beautifully in the air fryer, creating a healthier alternative to deep-fried donuts.
- Customizable Toppings: Whether it’s chocolate glaze, powdered sugar, or sprinkles, these batters allow endless creativity.
Each recipe offers a unique flavor and texture, making it easy to find one that suits your taste.
Adjusting Consistency for Even Results
Consistency is key to achieving evenly cooked mini donuts. A batter that’s too thick may not cook through, while one that’s too thin can spread too much. Aim for a smooth, pourable batter that holds its shape when spooned into the air fryer.
If the batter feels too thick, add a small amount of milk or water to thin it out. For a batter that’s too runny, mix in a little flour until it reaches the right consistency. Adjusting the batter ensures the donuts cook evenly and brown perfectly in the visible air fryer.
Tip: Test a small batch first to check the consistency and make adjustments as needed. This saves time and ensures every donut turns out just right!
Grease the Basket or Tray
Preventing Sticking
No one likes the frustration of donuts sticking to the basket. Greasing the basket or tray is a simple yet crucial step to avoid this problem. Without it, the batter can cling to the surface, ruining the shape and making cleanup a hassle. A light coating of oil creates a non-stick barrier, allowing the donuts to cook evenly and release effortlessly.
To grease the basket, use a pastry brush or a paper towel to apply a thin layer of oil. Make sure to cover the entire surface, including the edges. Avoid using too much oil, as it can pool and affect the texture of the donuts. For those using a visible air fryer, this step ensures the donuts stay intact and look picture-perfect through the window.
Tip: Always grease the basket before preheating to prevent burns or uneven coating.
Best Oils for Air Frying Mini Donuts
Choosing the right oil can make a big difference in flavor and performance. Neutral oils like canola, vegetable, or grapeseed work best for mini donuts. They have a high smoke point and won’t overpower the sweetness of the batter. Coconut oil is another great option, adding a subtle hint of flavor that pairs well with donuts.
Avoid using aerosol sprays directly on the basket, as they can damage the non-stick coating over time. Instead, opt for a refillable oil sprayer or apply the oil manually. This not only protects your fryer but also ensures an even application.
Note: A little oil goes a long way. Over-greasing can lead to soggy donuts, so stick to a light, even layer.
Space Donuts Properly in the Basket
Benefits of Proper Spacing
Spacing mini donuts properly in the air fryer basket is more than just a neat trick—it’s essential for even cooking. When donuts are spaced out, hot air can circulate around each one. This ensures they cook evenly, with no soggy spots or undercooked centers. Plus, proper spacing helps achieve that beautiful golden-brown color on all sides.
Crowded donuts can stick together, ruining their shape and texture. By giving each donut its own space, you allow them to rise and expand without interference. This small step makes a big difference in the final result.
Tip: Leave at least half an inch of space between each donut. This gives the air fryer enough room to work its magic!
Avoiding Overcrowding
Overcrowding the basket might seem like a time-saver, but it often leads to disappointing results. When too many donuts are packed together, the air fryer struggles to circulate heat evenly. This can leave some donuts overcooked while others remain raw in the middle.
Instead of cramming all the donuts into one batch, cook them in smaller batches. It might take a little longer, but the results are worth it. Each donut will come out perfectly cooked, with a light and fluffy texture.
Note: If you’re in a hurry, try using a multi-layer rack designed for air fryers. This lets you cook more donuts at once without sacrificing proper spacing.
Monitor Through the Visible Window
Using the Window for Perfect Timing
The visible window on an air fryer isn’t just for show—it’s a game-changer for baking mini donuts. Watching the donuts through the glass helps bakers keep track of their progress without opening the fryer. This prevents heat loss, which can disrupt cooking and lead to uneven results.
Timing is everything when it comes to achieving that golden-brown perfection. The window allows bakers to see when the donuts start to puff up and develop a light crust. This visual cue signals that the donuts are cooking evenly and are on track. For most recipes, mini donuts take about 5-8 minutes at 350°F. However, every air fryer is slightly different, so keeping an eye on the donuts ensures they don’t overcook.
Tip: Use the window to check for consistent browning. If one side looks darker, it might be time to flip the donuts.
Recognizing When to Flip or Remove Donuts
Flipping donuts at the right moment is key to even browning. The visible window makes this step easier by showing when the bottoms have turned golden. A quick peek through the glass can reveal if the donuts are ready to be flipped. Typically, flipping should happen halfway through the cooking time.
When the donuts look evenly browned on both sides, it’s time to remove them. Overcooking can dry them out, so it’s better to err on the side of caution. The visible air fryer’s window helps bakers make these decisions with confidence, ensuring every batch comes out just right.
Note: Use tongs or a silicone spatula to flip or remove donuts without damaging their shape.
Flip Donuts for Even Browning
Timing the Flip
Flipping mini donuts at the right time is crucial for achieving that perfect, even browning. The visible air fryer makes this step easier by letting bakers monitor the progress without opening the fryer. But when exactly should the flip happen?
The best time to flip is when the bottom side of the donuts turns a light golden brown. This usually happens about halfway through the cooking time. For example, if the recipe suggests 6 minutes, flip the donuts around the 3-minute mark. Waiting too long can cause one side to overcook, while flipping too early might leave the bottom underdone.
Tip: If unsure, use the visible window to check the color. A quick peek can help decide if it’s time to flip.
Flipping ensures both sides cook evenly, giving the donuts a consistent texture and appearance. It also helps avoid soggy bottoms, which can happen if one side stays in contact with the basket for too long.
Tools for Flipping Without Damage
Flipping mini donuts can be tricky, especially if they’re still soft. Using the right tools makes the process smooth and prevents damage. Silicone tongs are a great choice. They’re gentle on the donuts and won’t scratch the air fryer basket. A silicone spatula also works well for lifting and flipping without breaking the delicate dough.
Avoid using sharp or metal tools, as they can tear the donuts or damage the fryer’s non-stick coating. For smaller donuts, a pair of chopsticks can even do the trick!
Note: Always flip gently to maintain the donuts’ shape and texture. A little patience goes a long way!
Adjust Temperature and Time
Ideal Settings for Mini Donuts
Getting the temperature and time just right is crucial for baking mini donuts in a visible air fryer. The sweet spot for most recipes is a preheated air fryer set to 330°F. This temperature ensures the donuts cook evenly without burning or drying out. Once preheated, bake the donuts for 4-7 minutes. The exact time depends on the size of the donuts and the specific air fryer model.
Here’s a quick guide to follow:
- Preheat the air fryer to 330°F.
- Bake mini donuts for 4-7 minutes.
- Check for a golden-brown color as a sign they’re ready.
Tip: Start with the lower end of the time range and add a minute or two if needed. It’s easier to bake them a little longer than to fix overcooked donuts.
Avoiding Overcooking or Undercooking
Overcooked or undercooked donuts can ruin the experience. An undercooked donut feels heavy and doughy, while an overcooked one turns dry and crumbly. The key is to find the balance where the donuts are fully cooked but still soft and moist.
To avoid these issues:
- Keep an eye on the donuts through the visible window.
- Look for a light golden-brown color as a sign they’re done.
- Test one donut by gently pressing it. It should spring back without feeling sticky.
Note: If the donuts seem undercooked, add 1-2 minutes and check again. Avoid leaving them in too long, as they can dry out quickly.
By mastering the temperature and timing, anyone can achieve perfectly baked mini donuts every time!
Add Finishing Touches
Glazing and Dusting Techniques
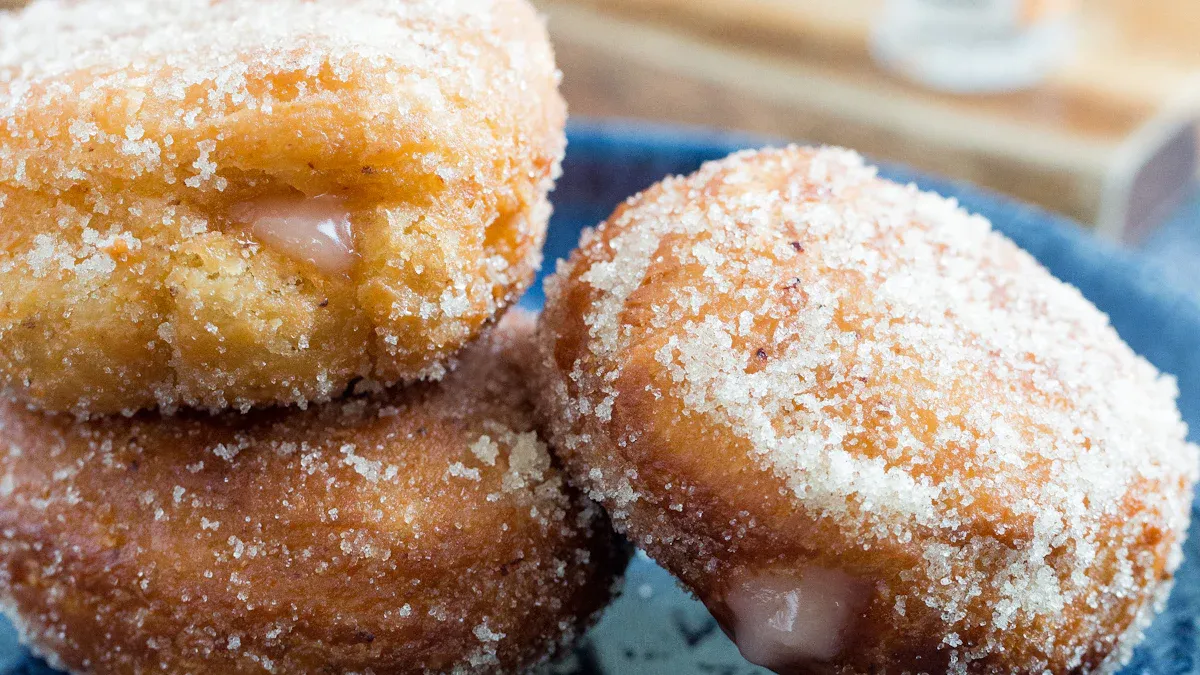
The final touches can transform mini donuts from simple treats into irresistible delights. Glazing and dusting are two easy ways to elevate their appearance and flavor. A classic glaze, made with powdered sugar, milk, and vanilla extract, adds a shiny, sweet coating. To make it, whisk the ingredients until smooth, then dip the donuts into the glaze while they’re still warm. Let the excess drip off before placing them on a rack to set.
For those who prefer a simpler option, dusting works wonders. Sprinkle powdered sugar or cinnamon sugar over the donuts for a light, flavorful finish. Use a fine-mesh sieve for an even coating. Want to get creative? Try cocoa powder, crushed nuts, or colorful sprinkles. These toppings not only add flavor but also make the donuts look festive and fun.
Tip: Always let the donuts cool slightly before glazing or dusting. This helps the toppings stick better without melting away.
Storing Donuts for Freshness
Proper storage keeps mini donuts fresh and delicious for longer. After air frying, let the donuts cool completely to prevent condensation. Once cooled, place them in an airtight container to minimize air exposure. This keeps them soft and prevents them from drying out.
For short-term storage, keep the container at room temperature. If you plan to store them for more than a day, refrigerate them to maintain freshness. Avoid stacking the donuts directly on top of each other. Use parchment paper between layers to prevent them from sticking or getting squished.
- Room temperature: Best for up to 1-2 days.
- Refrigeration: Ideal for longer storage, up to a week.
- Avoid stacking: Protects the donuts’ shape and texture.
Note: Reheat refrigerated donuts in the air fryer for a few minutes to restore their softness and warmth.
Baking mini donuts in a visible air fryer offers a fun and easy way to create delicious treats. Each step, from preheating to glazing, ensures perfect results. These tips make the process simple and enjoyable for anyone. Try them today and enjoy the golden-brown goodness of air-fried donuts!
FAQ
How do you know when mini donuts are done in the air fryer?
Look for a golden-brown color and a springy texture when pressed. Use the visible window to monitor their progress without opening the fryer.
Tip: Test one donut by cutting it open to ensure it’s fully cooked.
Can you use store-bought dough for mini donuts?
Yes, store-bought dough works great! Biscuit dough or pre-made donut dough are excellent options. They save time and still deliver delicious results.
What’s the best way to reheat air-fried mini donuts?
Reheat mini donuts in the air fryer at 300°F for 2-3 minutes. This restores their softness and warmth without making them soggy.
Note: Avoid microwaving, as it can make donuts rubbery.